It’s time for a quick lesson on organizing basics! We love quick wins that pack a big punch, and in today’s Quick Win Friday tutorial, we want to teach you the primary method for organizing your silverware drawer in your kitchen. As you follow this process, don’t get hung up on the specific drawer or products that we show in the photos. Kitchen drawers come in all shapes, sizes, depths, and materials. Make adjustments based on your kitchen’s requirements, using them as a visual guide. Grab a drink, head to your current utensil drawer, and let’s do this quick project together. Ready? Let’s Go!
Stage 1: Delete all from drawers
We mean, empty it. Remove every divider, tray, drawer liner, and sticker; everything other than the drawer itself needs to go. As you’re removing items, if you come across something that doesn’t belong, put it away now. Do not wait until later, do not leave it on the counter – put it away right away before moving on. Using a damp paper towel, wipe out your drawer once it has been emptied. If you kept utensil trays inside, wipe them clean or hand wash them.
Stage 2: Install Drawer dividers & Silverware organizers
People often forget about it, but it’s crucial. Instead of slapping a divided utensil tray into the drawer and letting it slide around all willy-nilly, you should position and secure it. This action will ensure that your drawer is clean and will prevent you from dropping useless items. Some utensil trays have little rubber feet that are supposed to keep them from sliding, oddly enough, they manage to move..
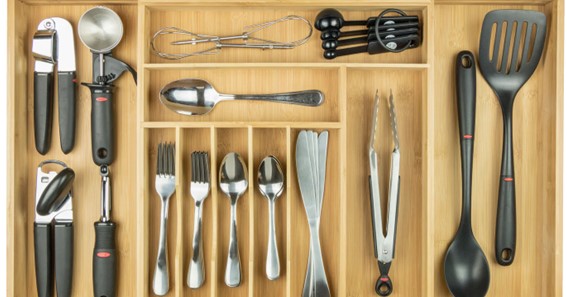
Silverware drawer organizer example: https://royalcraftwood.com/products/bamboo-silverware-drawer-organizer-natural
One more action that should not be forgotten. Instead of slapping a divided utensil tray into the drawer and letting it slide around all willy-nilly, you should position and secure it. This action helps you to keep your drawer cleen & do not add unnecessarily things. Some utensil trays have little rubber feet that are supposed to keep them from sliding, but they always try to find a way to move.
click here – Advancements In Mental Health Care And Treatment
Stage 3: Put only everyday utensils use
The initial step of restocking the drawer is adding your regularly used utensils. This is the cutlery set you use for every meal. The ones you use to spread peanut butter and sneak ice cream spoonfuls when no one is watching. Not your special occasion utensils, serving pieces, steak knives, or extra sets in different colors or patterns. PS: If they’re mismatched and look worn out, this post shows you how to revive them.
Most utensil trays available to purchase have five main slots for dinner forks, salad forks, soup spoons, dessert spoons, and butter knives. Most of these trays have additional, shorter space at the top that is oddly shaped. However, there is no need to use this slot in the same way as the others simply because that is how the tray was designed. If you do not have two sets of spoons and forks, the extra slots can be utilized for other utensils, such as steak knives, serving utensils, chopsticks, or straws. If you require a new tray, this is my favorite and the one I use most often in my clients’ homes.
click here – Best 5 Adobe Photoshop Alternatives
Stage 4: Add additional drawer organizers & fulfill them
Making your kitchen drawer more organized is simple with some tricks. You can buy drawer trays and compartments in kits or individually that use every inch of your drawer. Even if your utensil tray takes up most of the drawer, there is probably empty space in the back or on the side.
Stage 5: Remake that does not fit
The utensils you use daily deserve a tidy, permanent home in your drawer. If something else doesn’t fit, it doesn’t need priority access. So don’t worry if your dinner party salad serving forks and holiday-printed cheese knives couldn’t join them. New great ways to store extra, lesser-used utensils are in stackable, lidded pasta containers in your pantry, utensil trays that can be stacked and slid into your dining room sideboard, or packed in airtight, sealed containers in your garage.
You can rotate through sets of utensils every few months if you have a few different locations and love them all. So the gold set can stay out during the winter holidays while the matte black and silver sets are packed up temporarily. You are swapping them out as seasons change will make it feel like you’re getting a whole new set every few months while also helping the locations prolong their lifespan.
You saw a complete guide for organizing your silverware. In turn, we recommend buying Royal Craft Wood’s silverware organizers (source). They are an attractive and easy way to keep your silverware sorted. Another way is to use drawer dividers to keep your silverware sorted and easy to grab. Lastly, you can use a utensil caddy to keep your silverware sorted and off the counter.