Have you ever wanted to take a hit from your bong but couldn’t because you didn’t have it with you or it broke?
Fortunately, you can whip up a quick homemade bong with a little imagination that will get you just as high as a store-bought glass piece.
What’s even better is that you probably already have everything you need to make DIY water bongs (and other homemade bongs) in your house.
Here, we’ll show you how to create three distinct types of handmade bongs, so you may always smoke when you don’t have any other options.
MAKE A HOMEMADE BONG WITH AN APPLE
The first DIY bong may appear unusual but bear with us. You will not be sorry.
Do you know how apples make a tasty and nutritious snack? They’re also an ideal foundation for a do-it-yourself bong. It’s quite simple to create, and it adds a sweet apple flavor to your hits as an added benefit.
STEP 1: COLLECT YOUR SUPPLIES
Apple bongs use only a few components and make very little effort. The first step is to gather everything you’ll need for your DIY bong:
- An apple (any fresh apple will do)
- A knife, chopstick, or screwdriver (something to make holes in your apple)
- A lighter
- Your favorite strain of cannabis
- Your filter
click here – 10 Types of Wire Fences
STEP 2: GET YOUR APPLE READY
When you have everything you need in front of you, you may begin constructing your makeshift bong. First and foremost, if the apple has a stem, remove it. That shouldn’t be any more difficult than twisting and taking it off.
Then, using your poking tool (a knife, chopstick, or clean screwdriver), poke down into the top of your apple where you just removed the stem. When you’re about halfway through the fruit, stop. You don’t want to make it to the bottom. Twist your instrument to create a conduit for your smoke to move through more easily.
Then, this time from the side, dig another tunnel. Make a path to the newly created “down stem.”
Twist your poking tool once more to create a more effective smoke path.
The second hole will serve as your mouthpiece. Inhale via the mouthpiece hole while pulling in air to ensure that the two channels are connected.
click here – 4 Cannabis Growing Ideas for 2022
STEP 3: CREATE A CARB HOLE
You should make a carb hole in your apple bong for better airflow.
Return your chopstick, screwdriver, or knife to the hole you made for the mouthpiece and push it through the fruit this time. Be cautious not to poke yourself in hand.
STEP 4: FINISH YOUR MAKESHIFT BONG AND GET IT READY TO USE
To complete your bong, insert your Mouth Peace into the mouthpiece hole. You’re now ready to fill your “bowl.” Remember the hole you drilled in the top of your apple?
That small dip where the stem previously was turns out to be a wonderful bowl for your cannabis. Grind your preferred strain and place it in the improvised bowl.
STEP 5: ENJOY BY INHALING THROUGH YOUR MOUTHPEACE.
Now comes the fun part: utilizing your bong! Place your mouth on your Mouth Peace and cover the carb hole with your finger. Inhale via the Mouth Peace after lighting your cannabis.
Hold the smoke in for a few seconds before letting it out when you’ve got what you want. Enjoy the smooth, clear taste of the smoke (with a little apple flavor!) and the effects of your cannabis.
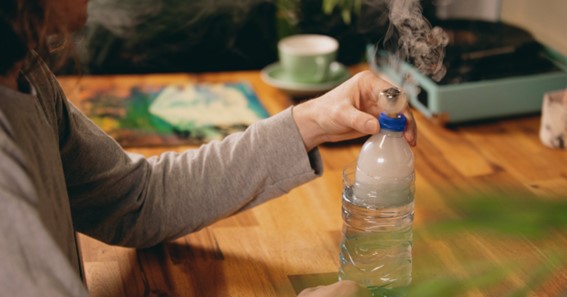
MAKE A HOMEMADE BONG WITH A WATER BOTTLE
If you smoked cannabis or knew someone who did, you may have come across this one in college.
A water bottle bong is a simple and inexpensive way to get high. Like the apple bong, a water bottle can be used to build a bong in a couple of minutes.
To get started, you’ll need the following:
- A clean plastic bottle (the larger the bottle, the more smoke you’ll be able to make)
- A sharp object such as a pen or knife
- A tube (such as straw or an emptied ballpoint pen)
- Aluminum foil
- A pin or sewing needle
- Cannabis
- Lighter
- Your Mouth Peace
STEP 1: POUR WATER INTO THE BOTTLE
Fill about a fourth of the way with water in your homemade bong. Like a glass piece, the water will work as a filter for your cannabis smoke.
STEP 2: MAKE A CARBON HOLE
Make a small, circular hole in the bottle immediately below the neck using your knife or pen. That will serve as your carb hole.
STEP 3: DEVELOP YOUR DOWNSTEM
It’s now time to create a down stem. Drill another hole in your plastic container right above the water inside. Make a hole large enough to fit your hollowed tube with your knife or pen (the emptied plastic case of a ballpoint pen is an effective tool). Insert your tube into the hole and push it down until it touches the water.
STEP 4: MAKE YOUR BOWL
To complete your down stem, you must create a bowl. Take out the tube. Wrap a piece of tinfoil around the outside of your down stem. Form it into a small foil basin. When satisfied, pierce a few holes through the foil that lead into the hollow tube with a pin or sewing needle. Those holes will allow smoke to enter the downstream and flow through your water bottle bong.
STEP 5: FIT YOUR WATER BOTTLE BONG
Now assemble your bong. Submerge the downstream in the water by inserting it through the opening at the waterline. Remove your water bottle’s cap (if it’s still on) and insert your Mouth Peace.
STEP 6: ASSEMBLE YOUR BOWL
After you’ve assembled everything, grind up your preferred strain of cannabis and pack it into your foil bowl. Cover the carb hole, put your mouth on your Mouth Peace, and prepare for the most exciting part.
STEP 7: GET STARTED
Activate your lighter. In your bowl, light the bud. Pull air into the bottle to assist smoke in going from the bowl into the bottle. Take your hit once you’ve had enough smoke.
FINAL THOUGHTS ON MAKING YOUR OWN BONG
Making your bong allows you to enjoy your favorite cannabis strains, whether or not you have a bond with them. You can make a homemade bong out of common household objects in only a few minutes. With Seed Supreme, you can elevate your experience.