Tools for data visualization are essential for converting unprocessed data into insights that can be put to use. Microsoft Power BI stands out among the leading competitors in this market thanks to its robust features and approachable user interface. One of the most desired aspects of Power BI is the capacity to write back data, which is one of the platform’s many functions.
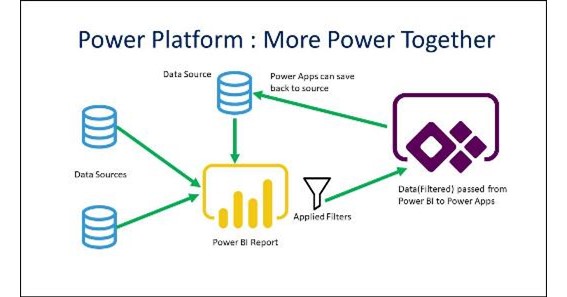
Users are given the ability to modify the data immediately from Power BI reports thanks to this write-back capability, which eliminates the need to transfer between programs and streamlines the decision-making process.
What is Write Back Functionality?
It’s important to understand the idea of Power BI write back capabilities before we go into the technical specifics. Users of Power BI can only view and interact with the data in a read-only mode by default, which prevents them from changing it. However, customers now have the option to edit data directly within Power BI reports thanks to the addition of write back.
In situations when real-time data updates and user interaction are necessary to guide business choices, this functionality is very helpful. For instance, inside the same Power BI interface, financial analysts may submit budget estimates, sales teams can enter leads, and operational teams can update inventory levels.
Prerequisites for Write Back
As with any technical project, setting up the foundation is essential before we begin implementing the write back capability. Consider the following prerequisites:
1. Data Source and Data Model: Make sure your data source allows for write-back functionality. Multiple data sources, including SQL Server, Excel, SharePoint, and others, are supported by Power BI. Establish a sound data model that will act as the basis for your reporting.
2. Power BI Service Account: You must have a Power BI Pro or Premium account in order to activate write back feature. Make sure you have the right rights in order to update and publish reports if you’re utilizing the Power BI service.
3. Power BI Desktop: Install the most recent version of Power BI Desktop, the program you’ll use to create your reports. It is available for download from the Microsoft website.
4. Data Gateway: To create a secure connection between your data source and the Power BI Service if you are dealing with on-premises data sources, you must set up a data gateway.
5. Write-Enabled Fields: Identify the fields in your data model that you want users to be able to write back to. Not all fields may require write-back functionality, so choose wisely.
Step 1: Prepare the Data Model for Write Back
We must set up our data model for write back capabilities before we can begin our adventure. Not every field in our data model will need write-back capabilities, as was previously noted. It’s crucial to identify and mark as write-enabled the fields that would be impacted by user input.
Open your data model in Power BI Desktop and go to the “Model” view. Click on the desired field here with the right mouse button, then choose “Mark as Write-Enabled.” Power BI is notified by this step that the field is available for data change.
Step 2: Create a Measure for Write-Back Validation
It’s wise to build up a validation system to check and regulate the data users submit before allowing them to publish back data. To do this, we’ll develop a measurement that validates data in accordance with predetermined criteria. If we have a field for sales forecasting, for instance, we might only want to allow user input that is larger than zero.
The measure will provide an error notice and ask the user to change their input if they submit an erroneous value. This process makes sure that the data being written back to the data source is accurate and complete.
Step 3: Designing the Power BI Report
We can now construct the Power BI report because our data model is ready for write back and has validation safeguards in place. You can alter a current report or write a brand-new one from start depending on your needs.
Remember that the report must have fields that can be edited and any necessary graphics to make data entry easier. To make it easy for users to submit data, you may utilize tables, matrices, or even bespoke forms.
Step 4: Adding Write Back Functionality
Adding write back capabilities to our Power BI report is the next exciting step. We’ll utilize Power BI’s “Edit Interactions” function, which gives us the ability to manage interactions between report items, to do this. It is essential to complete this phase because it establishes which graphics may be written to and how they react to user input.
Open your report in Power BI Desktop and go to the “Format” tab. The “Edit Interactions” button is located here. To view a matrix including every image in your report, click on it.
Select the destination visual and change its interaction with the input visual to “Edit” to enable write-back capabilities. By performing this operation, the input visual’s data may be fed into the selected visual.
Step 5: Implementing Row-Level Security
Strong security measures must be put in place to limit who may edit the data as we enable users to write back data. Power BI’s Row-Level Security (RLS) feature gives you the ability to limit data access depending on user roles and permissions.
The report may be made safe and tailored for each user by using RLS to guarantee that they only view the data they are permitted to alter.
Step 6: Testing and Validating the Write Back Functionality
The write back functionality must be thoroughly tested and validated before we can claim our implementation to be finished. To replicate user interactions and inputs in the real world, create test scenarios.
Check that the data reported back properly represents the data source and that the validation mechanisms respond effectively to incorrect inputs. Before the report is made available to end users, testing will help find any problems or discrepancies that need to be fixed.
It’s time to publish the Power BI report with the target audience now that our write back capability has been created and tested properly. You may either publish the report to the NetSuite Power bi service or an on-premises Power BI Report Server, depending on how your company is set up.
Make that people who have the required permissions may view the report and engage with the write-enabled graphics.
Additionally, let users know the write back function is available and give them whatever training or documentation they need to make the most of this useful tool.
Wrapping Up
The Power BI write back capability may be implemented to expand the possibilities for data-driven decision-making. Organizations may speed their workflows, increase data accuracy, and promote real-time collaboration by enabling users to edit data from within the reports.
Our trip has taught us how to set up the data model, create the report, add write back capabilities, and put security measures in place.
You may now go off on your own journey into the world of Power BI write back, releasing the full potential of your data visualization efforts, using this step-by-step guidance as your compass. Happy adventuring!
Click Here – Stand Out in the Mailbox: Tips for Eye-Catching Mailing Bag Printing